18 Stunning Stepping Stone Walkway Ideas That Will Transform Your Yard
Most people don’t realize how much a simple stone path changes the entire mood of a yard. One winding walkway through the garden and suddenly everything feels intentional — like someone actually designed this space. Whether your style leans cottage-cozy or clean and modern, stepping stone paths are one of the easiest upgrades you can make outdoors. Here are 18 beautiful ideas to get you inspired.
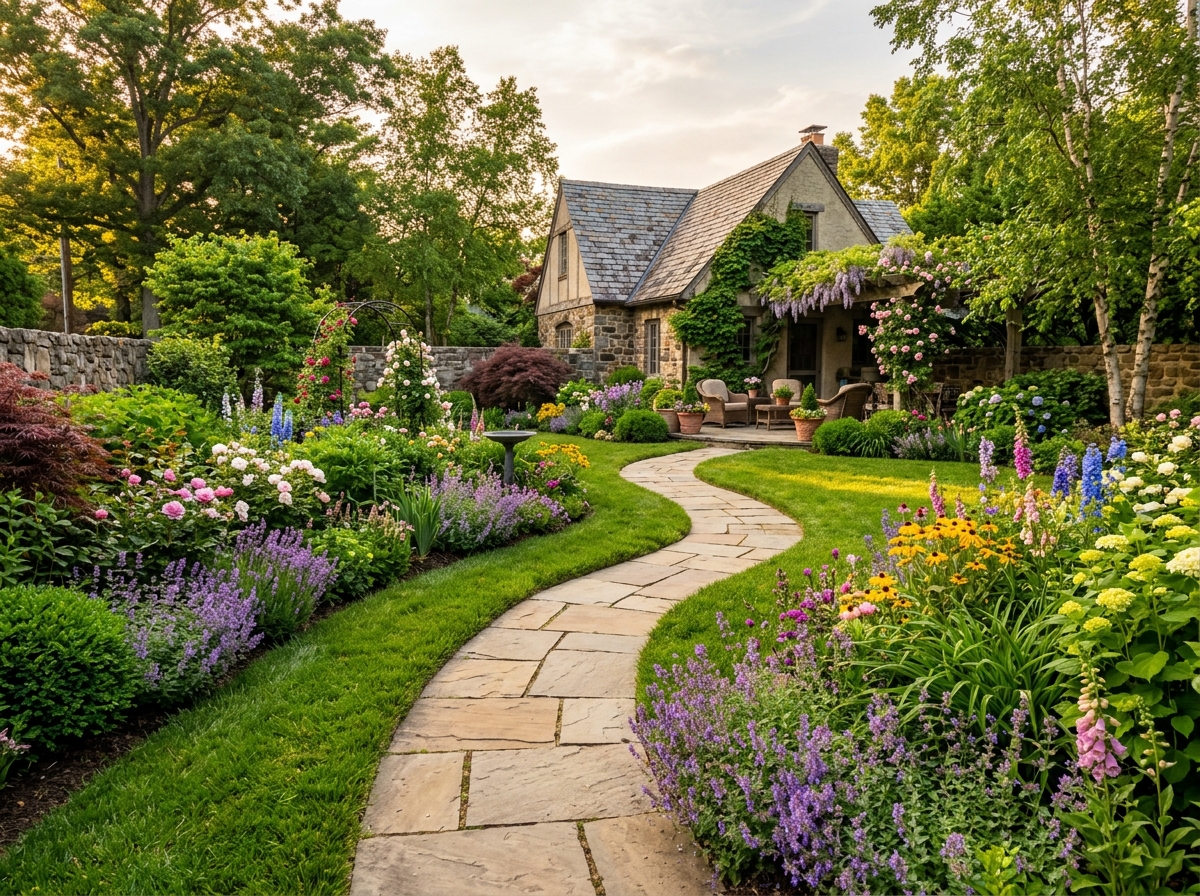
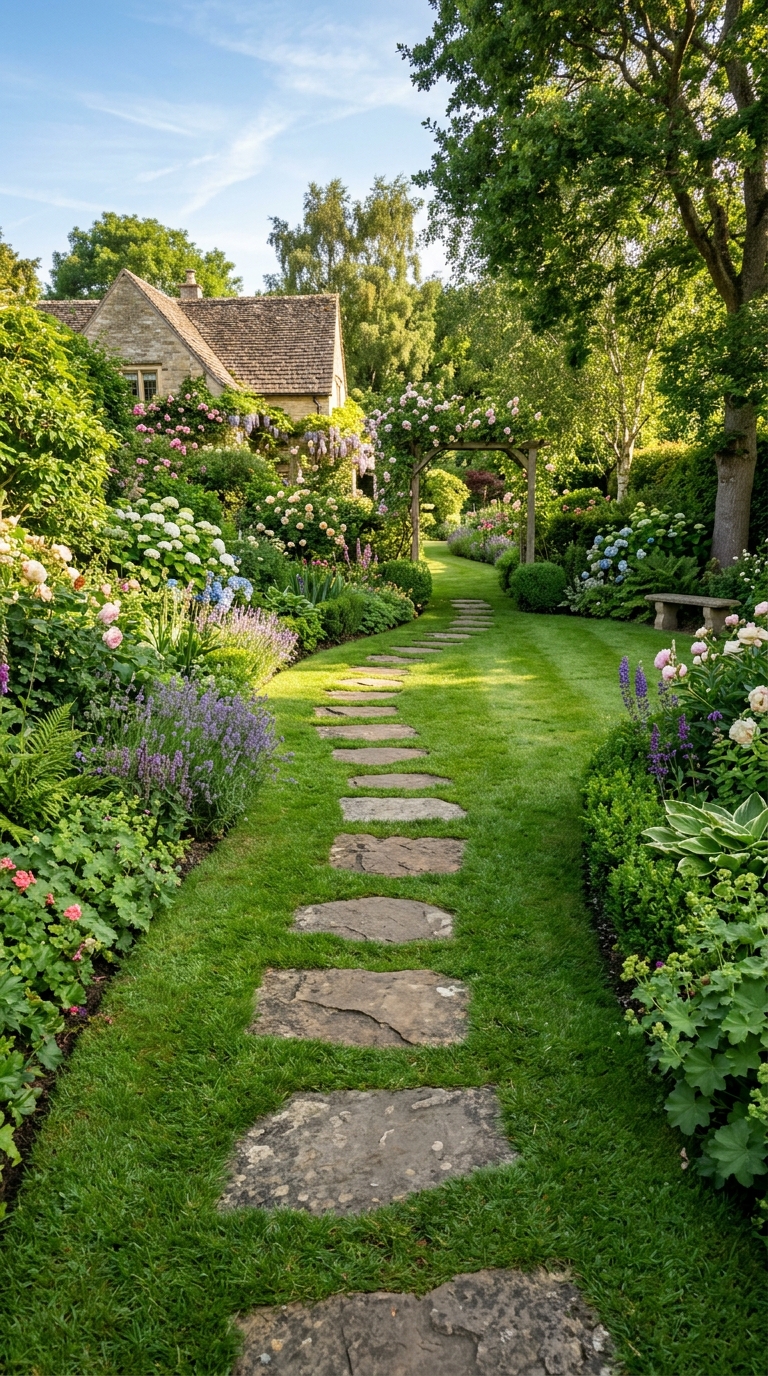
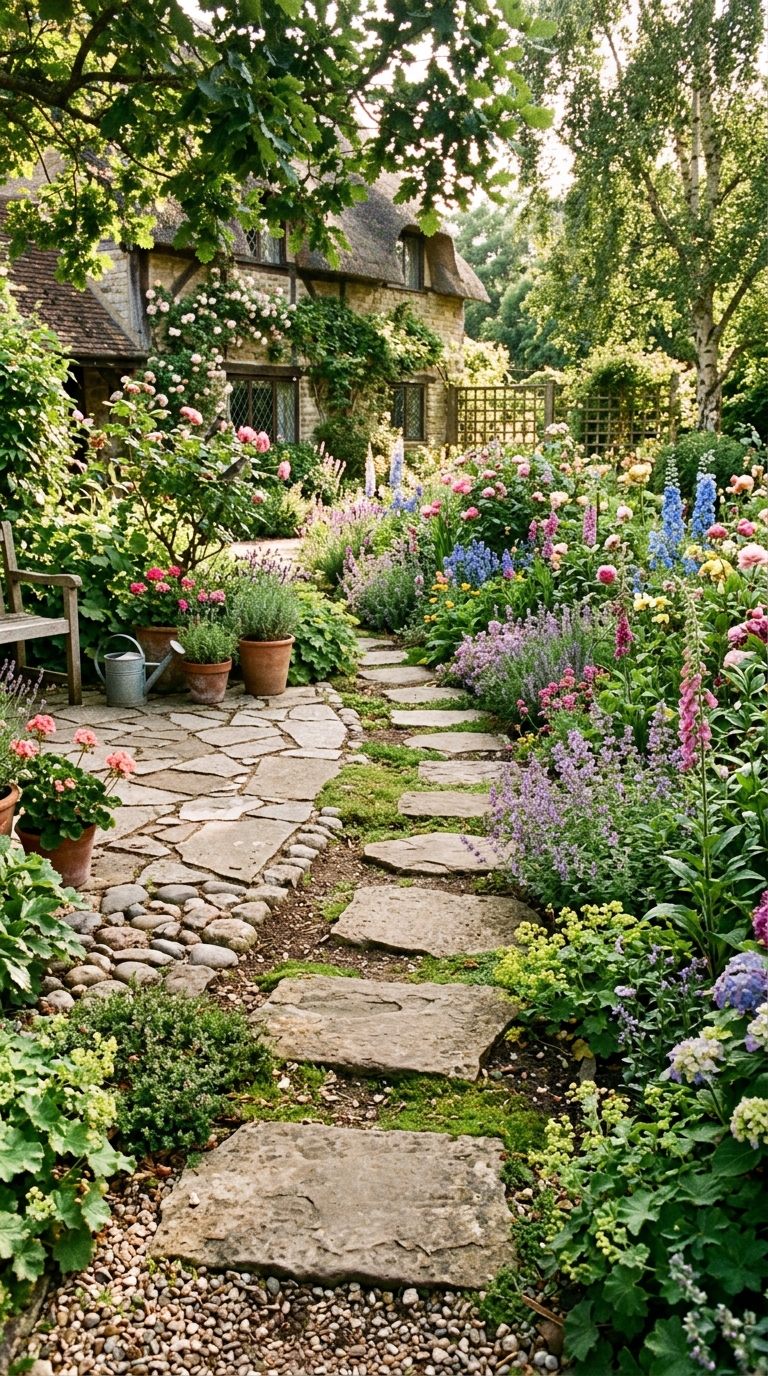
Mossy Flagstone Path Through a Cottage Garden
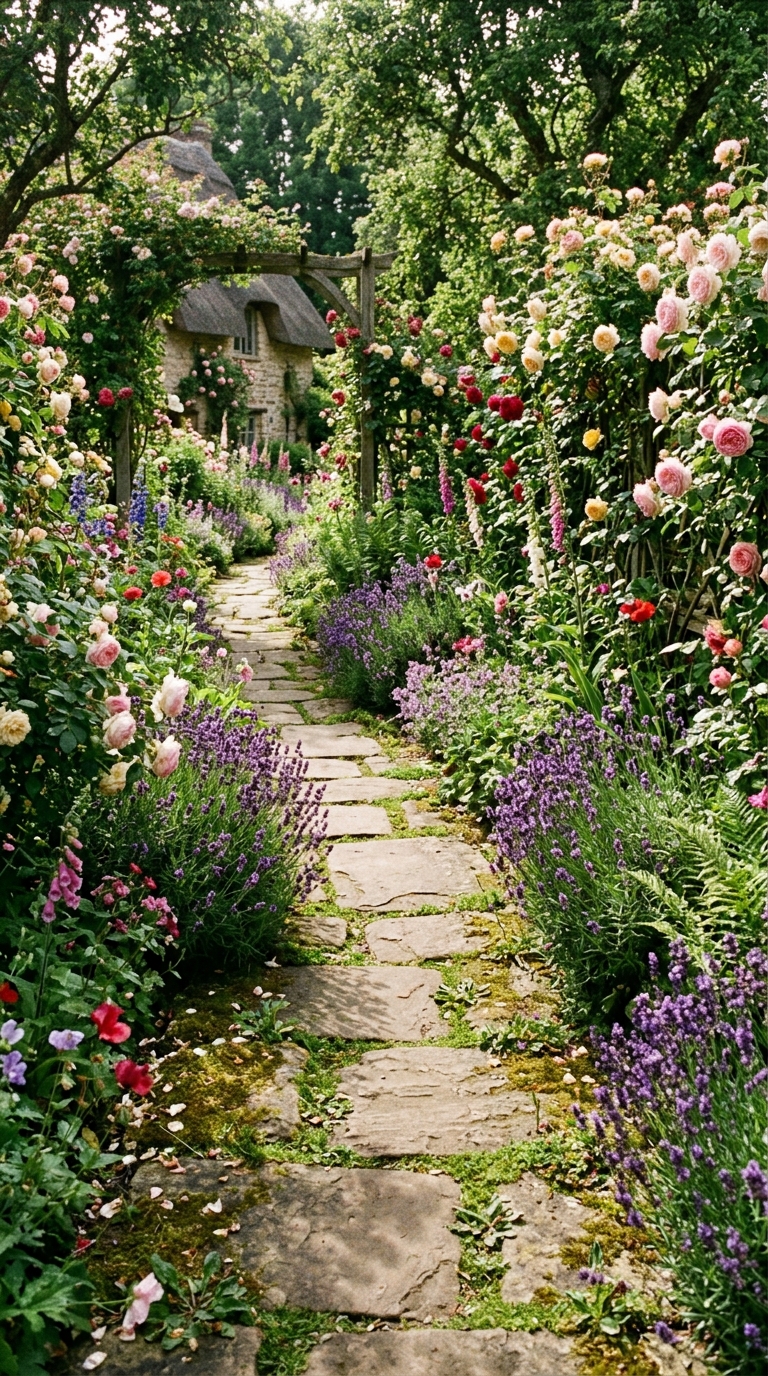
There’s something almost magical about a flagstone path with soft moss filling the cracks. The irregular stone shapes make the walkway feel like it’s always been there — like the garden grew around it naturally. This look works especially well in shaded or partly shaded yards where moisture helps moss thrive.
Pair the flagstones with lavender, salvia, or trailing rosemary along the edges for that dreamy English cottage effect. The combination of rough stone and soft green creates a texture contrast that looks absolutely stunning in photos.
For a more structured and long-lasting pathway solution, browse these paver walkway ideas that instantly improve curb appeal and outdoor functionality.
Design Highlights:
- Choose warm-toned grey or honey flagstone for the coziest look
- Allow moss to grow naturally or transplant it between joints
- Border the path with low cottage flowers like alyssum or creeping phlox
- Keep stone edges irregular — avoid cutting them into uniform shapes
- Add a wooden garden gate at the entrance to complete the cottage feel
Concrete Slab Stepping Stones in a Modern Backyard
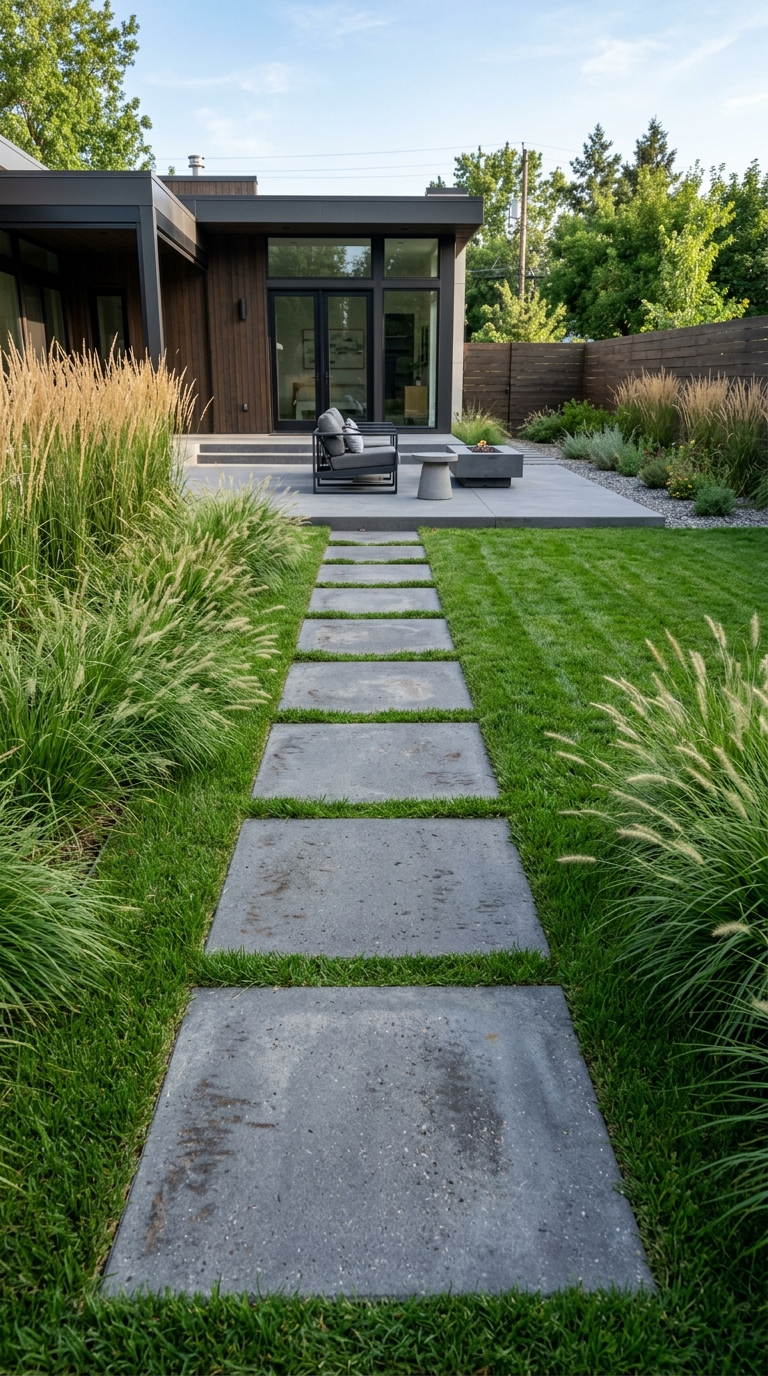
Large square concrete slabs are one of the most versatile and budget-friendly options for a modern garden. They bring a clean, architectural quality to the yard without competing with your plants or outdoor furniture. Spaced evenly through a lawn or gravel bed, they create instant structure.
The key is keeping everything around them minimal — simple grasses, a neutral gravel border, and clean edges. Concrete slabs age beautifully, too, developing a subtle weathered patina over time that actually adds character.
Design Highlights:
- Choose 18×18 or 24×24 inch slabs for a bold, confident look
- Set slabs slightly below grass level for a seamless flush finish
- Pair with black pebble borders for a contemporary edge
- Add ornamental grasses on either side for soft movement
- Seal the concrete to slow weathering and prevent staining
Natural Stone Path With Pea Gravel Fill
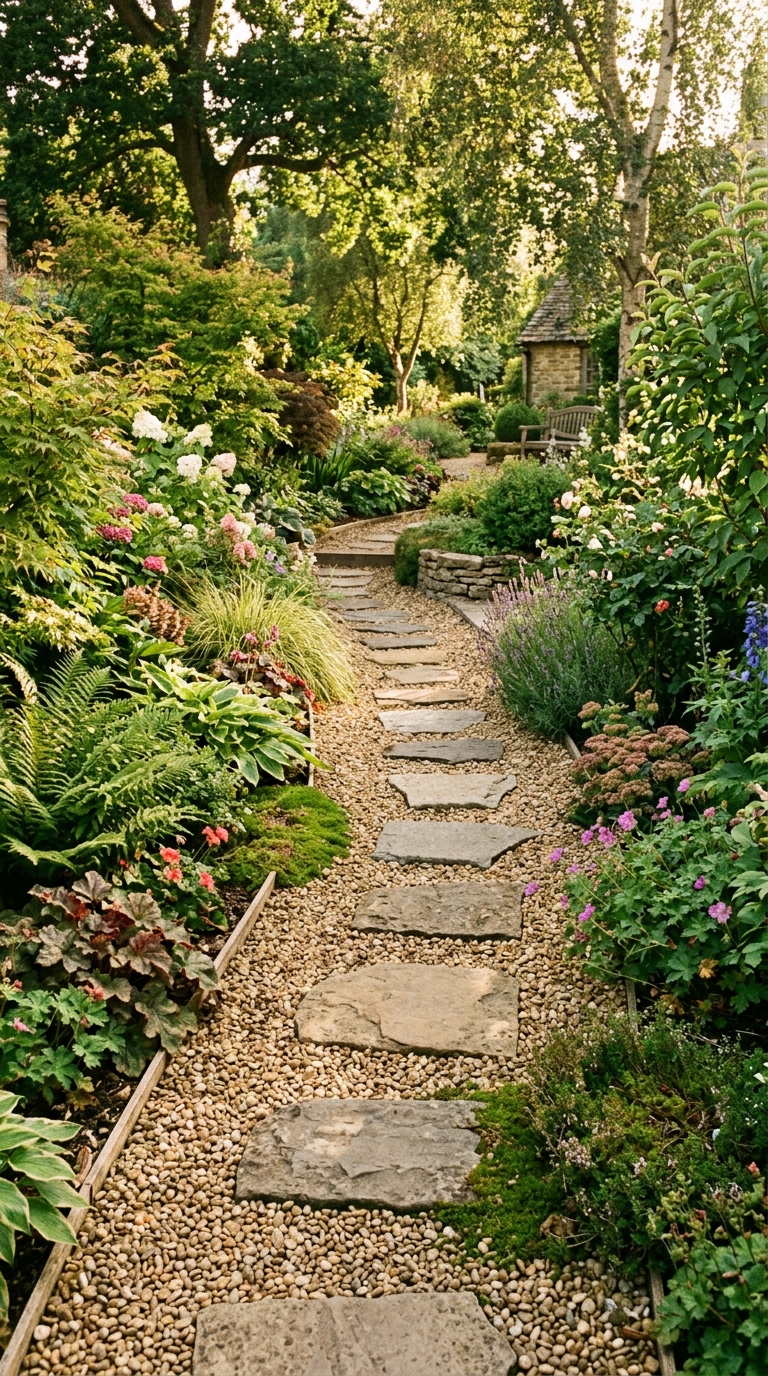
This combination is a classic for good reason — irregular natural stones set into a bed of smooth pea gravel creates a look that feels both relaxed and polished. The gravel fills gaps naturally, drains beautifully, and requires almost no maintenance. It’s one of the most forgiving DIY paths you can build.
The contrast between the rough stone surface and the round, smooth pebbles is visually satisfying. Keep the path slightly curved rather than straight for a more organic, landscape-designer feel.
If you’re drawn to a cozy and nature-inspired pathway, these wooden walkway ideas showcase beautiful designs for gardens, backyards, and outdoor retreats.
Design Highlights:
- Use grey or buff-toned natural stone for the most timeless look
- Choose pea gravel in a complementary warm beige or dove grey
- Install a landscape fabric base underneath to suppress weeds
- Edge the path with simple steel or stone borders to keep gravel contained
- Add solar stake lights along the edge for a lovely evening glow
Stepping Stones Set in a Green Lawn
Sometimes the simplest approach is the most elegant. A row of large flat stones set directly into a lawn — flush with the grass level — creates a clean, understated walkway that lets the garden do the talking. No gravel, no edging, just stone and grass.
This style works for every yard size and suits farmhouse, traditional, and cottage aesthetics equally well. The trick is spacing — stones placed at natural stride length (about 18 to 20 inches apart) feel effortless to walk across.
Design Highlights:
- Choose large, flat stones at least 16 inches wide for comfortable stepping
- Set each stone slightly below grass level so the mower glides right over
- Use round or irregular shapes for a casual look, squares for a formal feel
- Keep the path gently curved — even a slight curve looks far more intentional than a straight line
- Let low clover or micro clover fill gaps for a lush, no-mow look
Japanese Zen Garden Stepping Stone Path
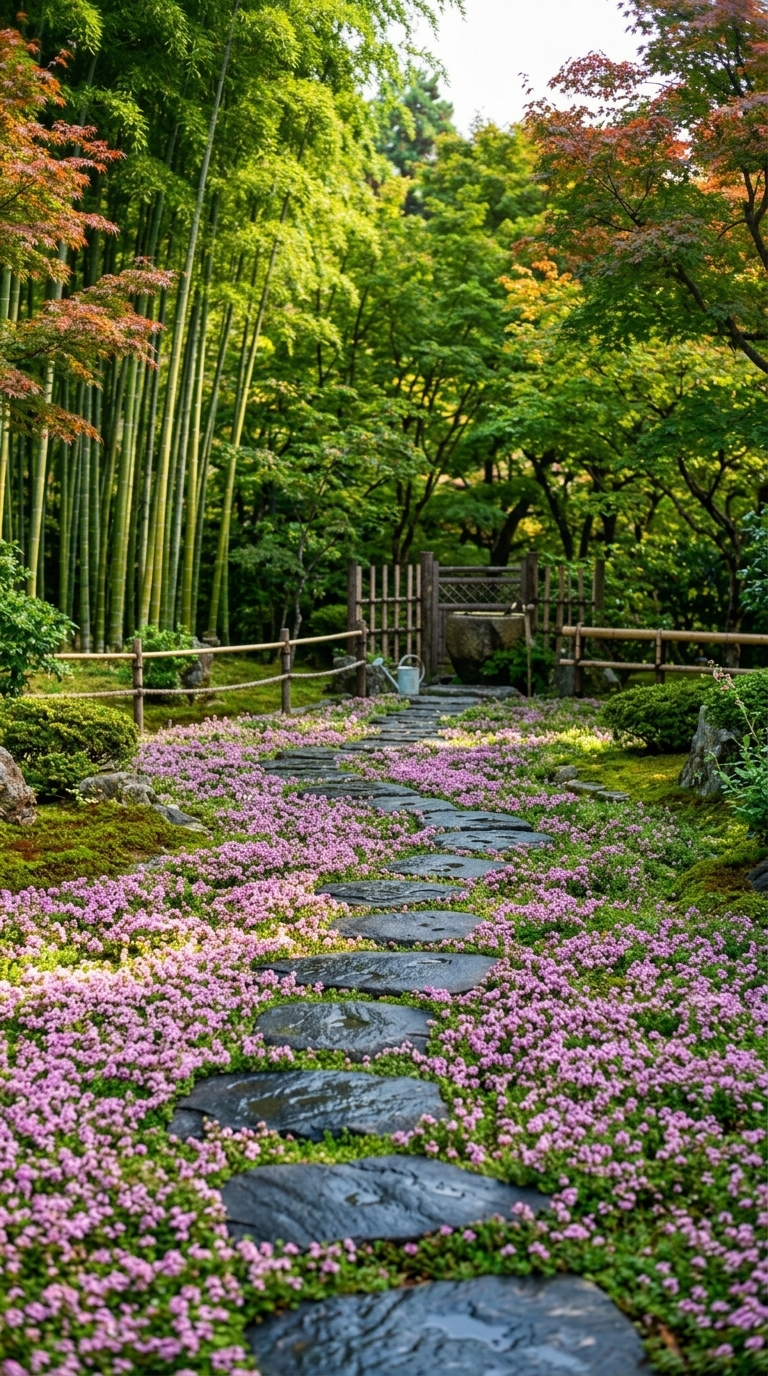
A Japanese-inspired stepping stone path brings an instant sense of calm to any outdoor space. The design relies on restraint — a few well-placed flat stones, raked gravel or decomposed granite, and very deliberate plant choices like bamboo, Japanese maple, or ornamental pine.
Every element in a zen garden is intentional. The stones aren’t just functional — they guide both the feet and the eye, creating a mindful journey through the space. This style suits shaded corners and small yards especially well.
Design Highlights:
- Choose dark grey or near-black flat stones for dramatic contrast against pale gravel
- Rake gravel in parallel lines or concentric curves around each stone
- Add a single Japanese maple or ornamental bamboo as a focal plant
- Keep the plant palette minimal — three species maximum
- Include a stone lantern or water bowl as an accent feature
Slate Stepping Stones With Creeping Thyme Between
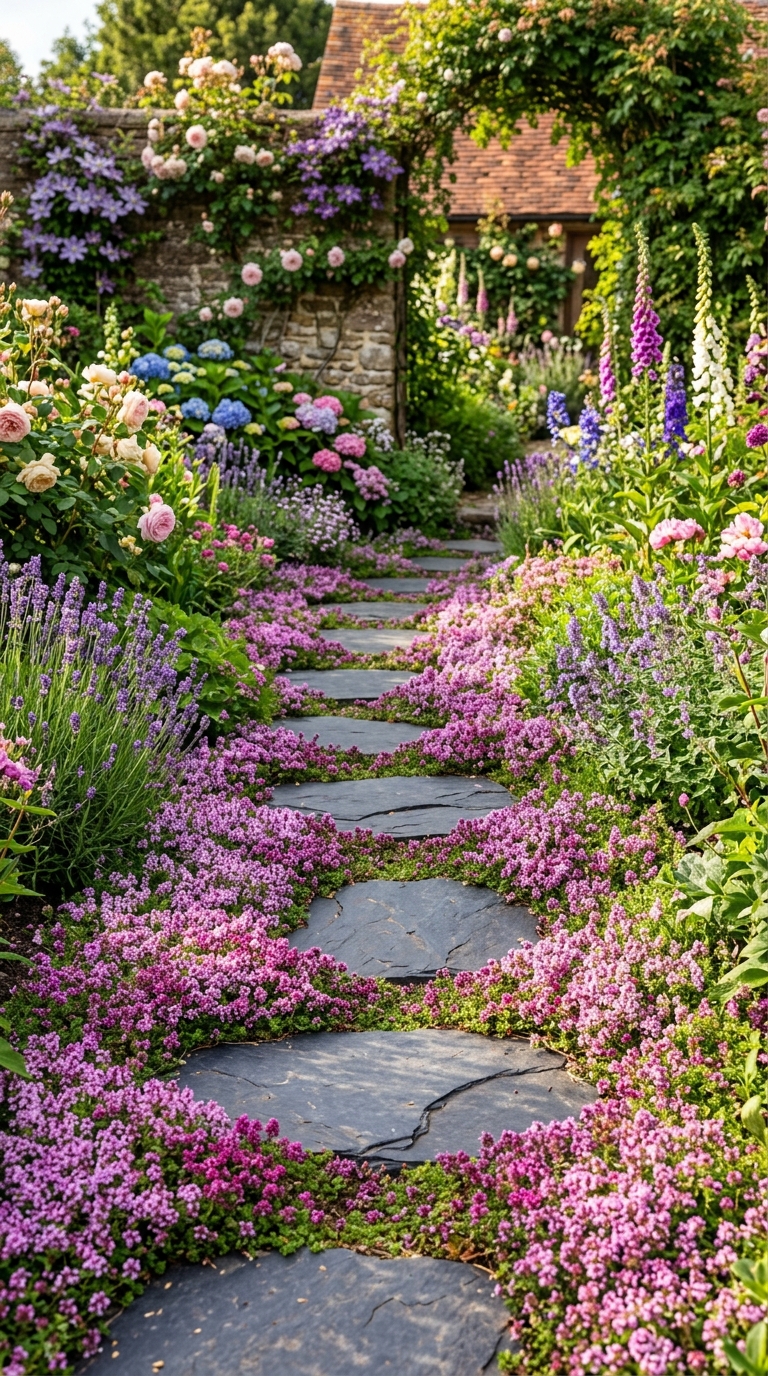
This is arguably the most Pinterest-pinned garden path look of the last few years — and for good reason. Slate’s deep charcoal-purple tones paired with the tiny pink-purple flowers of creeping thyme in summer create a combination that genuinely stops people mid-scroll.
Creeping thyme is also wonderfully practical: it’s drought-tolerant, releases a pleasant fragrance when stepped on, suppresses weeds, and stays low enough to never block the stones. It’s the perfect ground cover for a path that needs to be both beautiful and easy to maintain.
Design Highlights:
- Choose dark grey or purple-toned slate for the richest color contrast
- Plant creeping thyme (Thymus serpyllum) between stones in early spring
- Water regularly the first season — after that, it’s nearly self-sufficient
- Combine with white or pink alyssum along the edges for extra bloom
- Avoid heavy foot traffic on thyme until it’s well established (one full season)
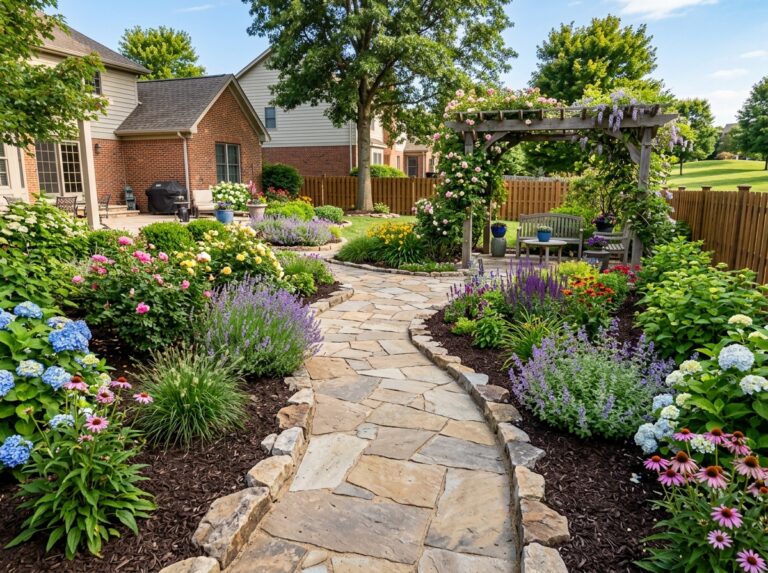
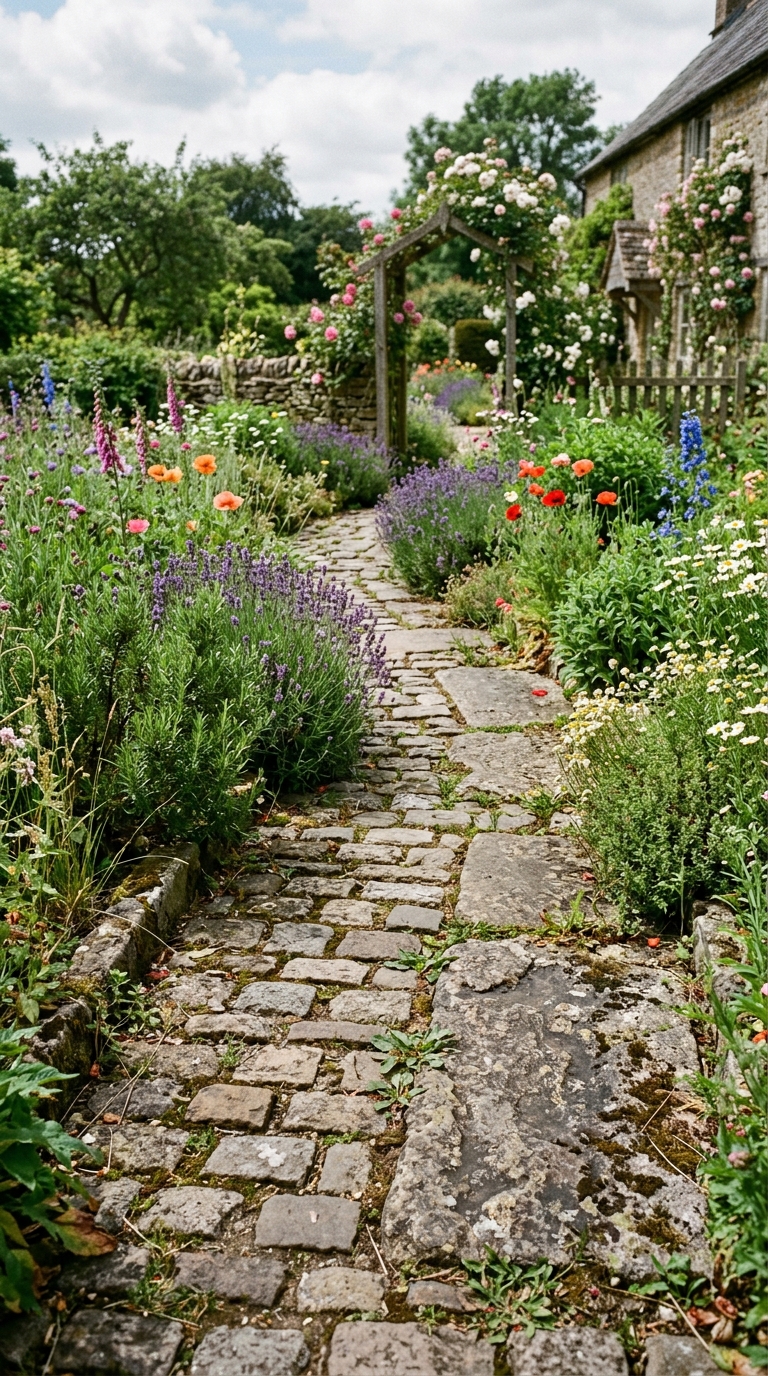
Curved Flagstone Path With Border Plants
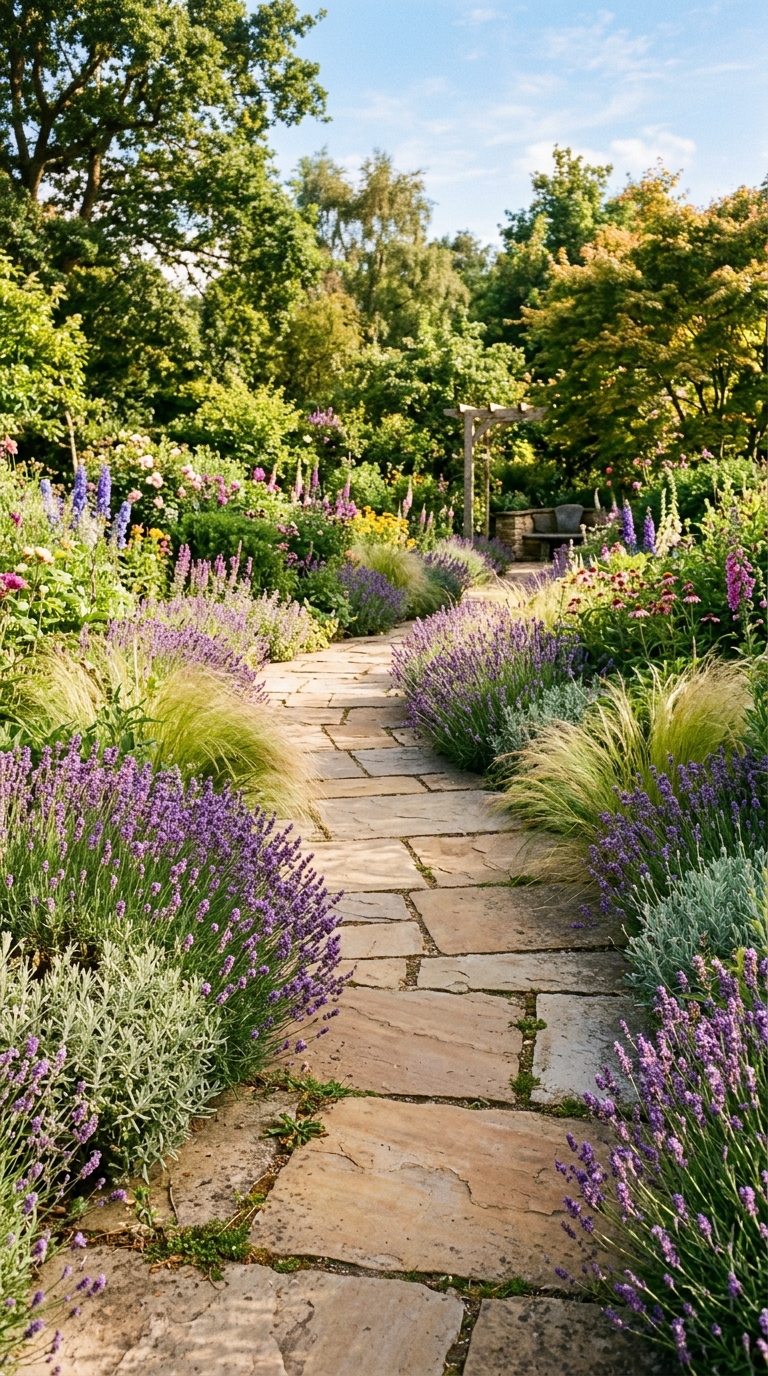
A curved flagstone path feels like something from a professional landscape portfolio — but it’s completely achievable as a DIY project. The curve is what makes all the difference. Even a gentle bend turns a plain stone path into a design feature that draws the eye through the garden.
Border the path with layered planting: tall ornamental grasses or catmint at the back, medium lavender or salvia in the middle, and low ground cover spilling onto the stones at the front. That layered effect is what makes garden path photos so irresistible to save.
Design Highlights:
- Mark your curve with a garden hose before digging — adjust until it feels natural
- Mix two or three sizes of flagstone for a more organic, less uniform look
- Use warm honey or buff-toned stone to complement green and purple planting
- Let edge plants spill slightly onto the path for a relaxed, overgrown feel
- Add one statement shrub — like a rose or hydrangea — at the curve’s focal point
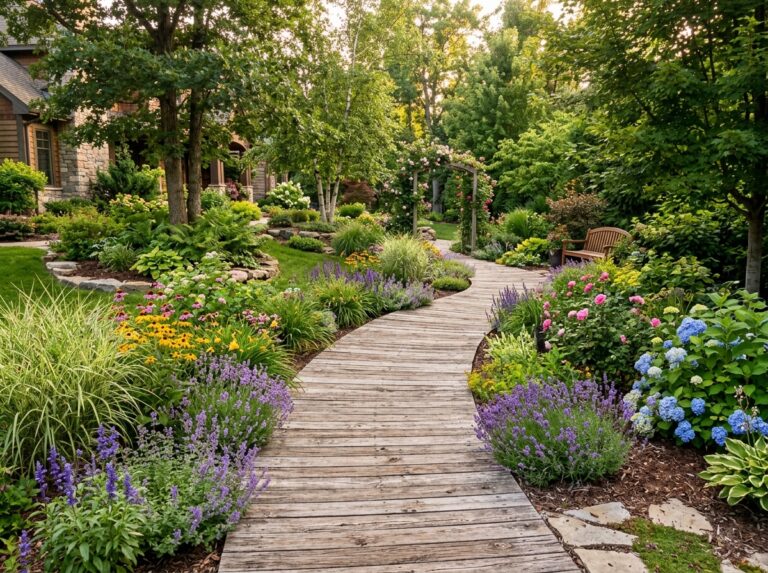
DIY Wooden Stepping Rounds Through a Woodland Garden
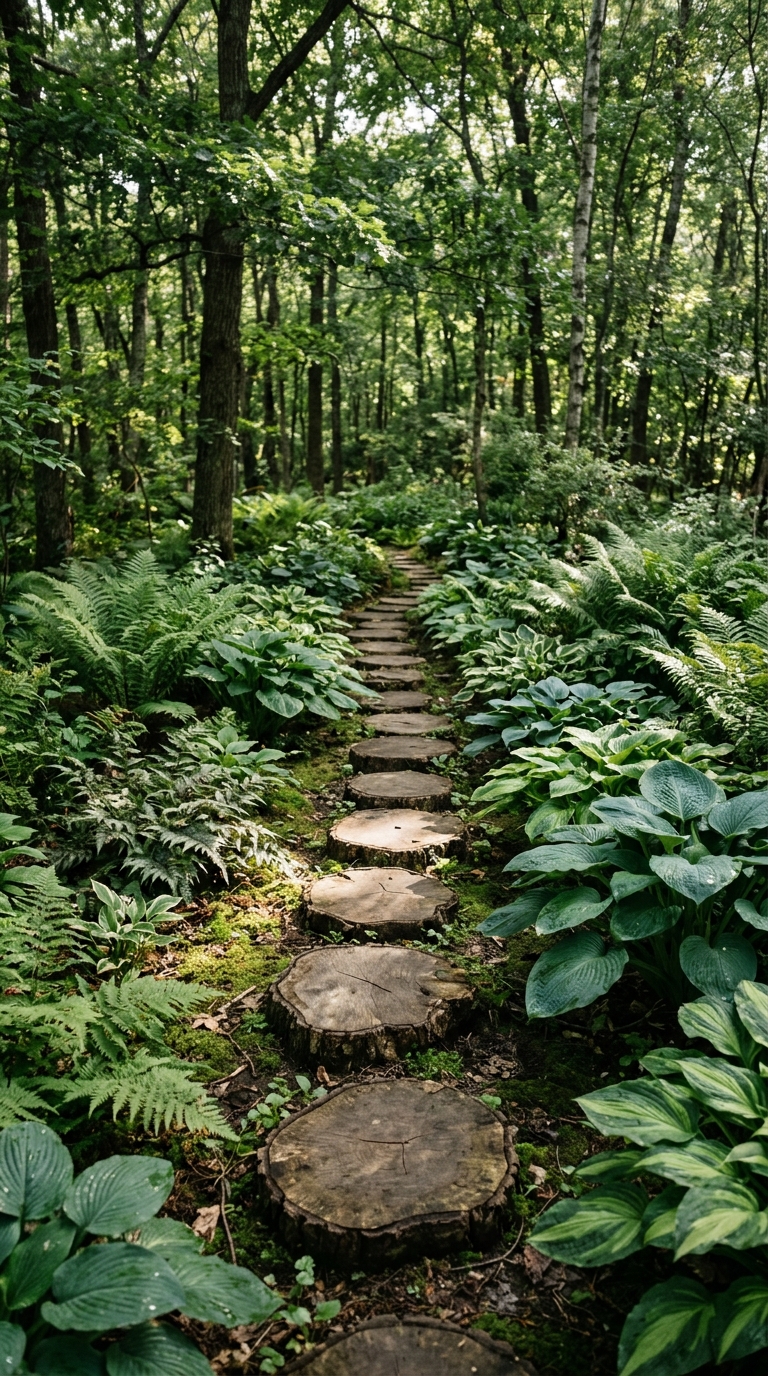
Cross-sections of tree trunks make surprisingly beautiful and affordable stepping stones — especially in shaded, woodland-style gardens. They bring warmth and an organic texture that no manufactured stone can replicate. Paired with ferns, hostas, and leaf litter, they look completely at home.
Treat the wood rounds with an exterior wood preservative to extend their life. While they won’t last forever like stone, they typically hold up well for 5 to 8 years and can be easily replaced. This is a perfect low-budget weekend project.
Design Highlights:
- Choose dense hardwood rounds (oak or cedar) for the longest lifespan
- Apply two coats of exterior wood sealant before setting into the ground
- Pair with shade-loving ground cover like sweet woodruff or wild ginger between rounds
- Set rounds at least 2 inches deep in sand for stability
- Surround with bark mulch for a complete woodland floor effect
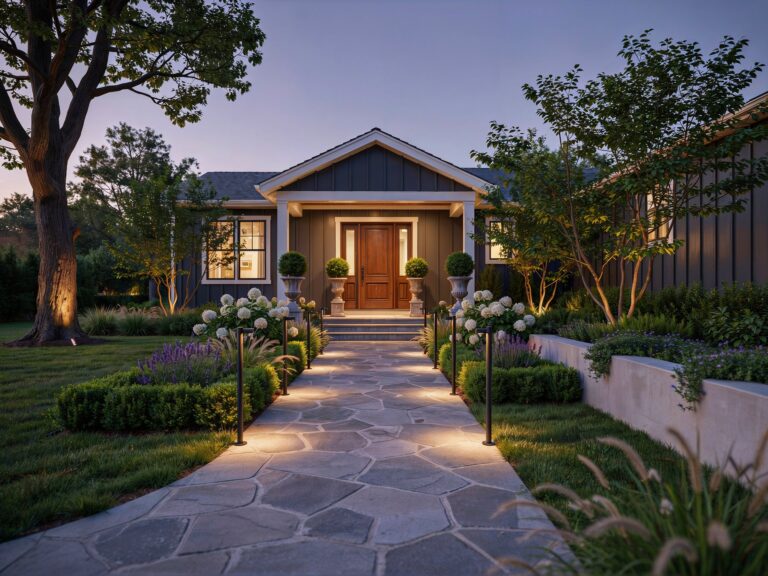
Bluestone Walkway to the Front Door
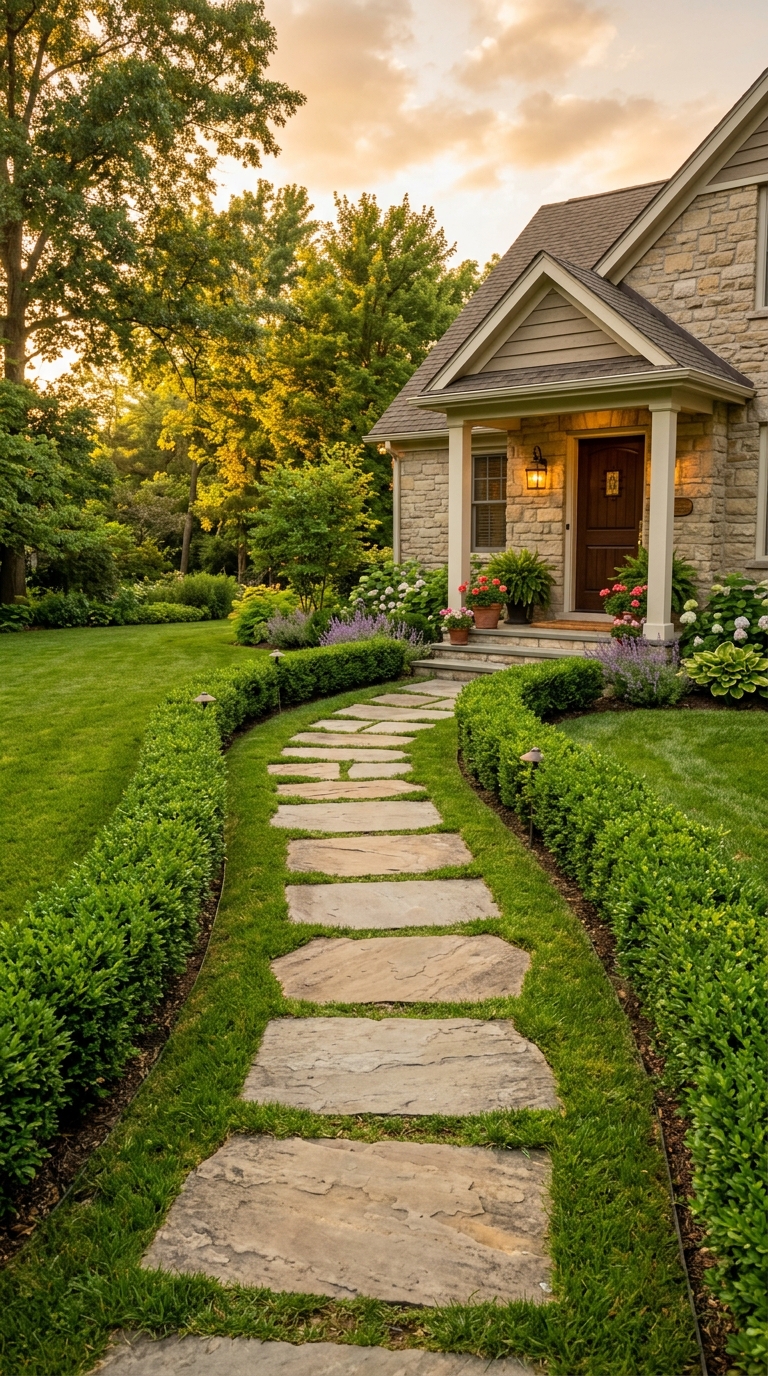
Bluestone is a premium material with a distinctly sophisticated look — its cool blue-grey tones are elegant without being cold. Used as a front yard walkway leading to the main entrance, it immediately elevates a home’s curb appeal and signals quality craftsmanship.
The most classic installation pairs large bluestone slabs with lush green grass joints. For a more formal look, set the stones in a straight line with uniform spacing. For something more relaxed, let the path curve gently with some groundcover creeping between the joints.
Design Highlights:
- Use honed or thermal-finish bluestone for slip resistance in wet weather
- Frame the path with matching bluestone borders or dark steel edging
- Plant low boxwood hedges or ornamental grasses on either side
- Add uplighting fixtures beside each stone for dramatic evening curb appeal
- Pressure wash annually to keep bluestone looking its best
Stepping Stones With Solar Path Lights
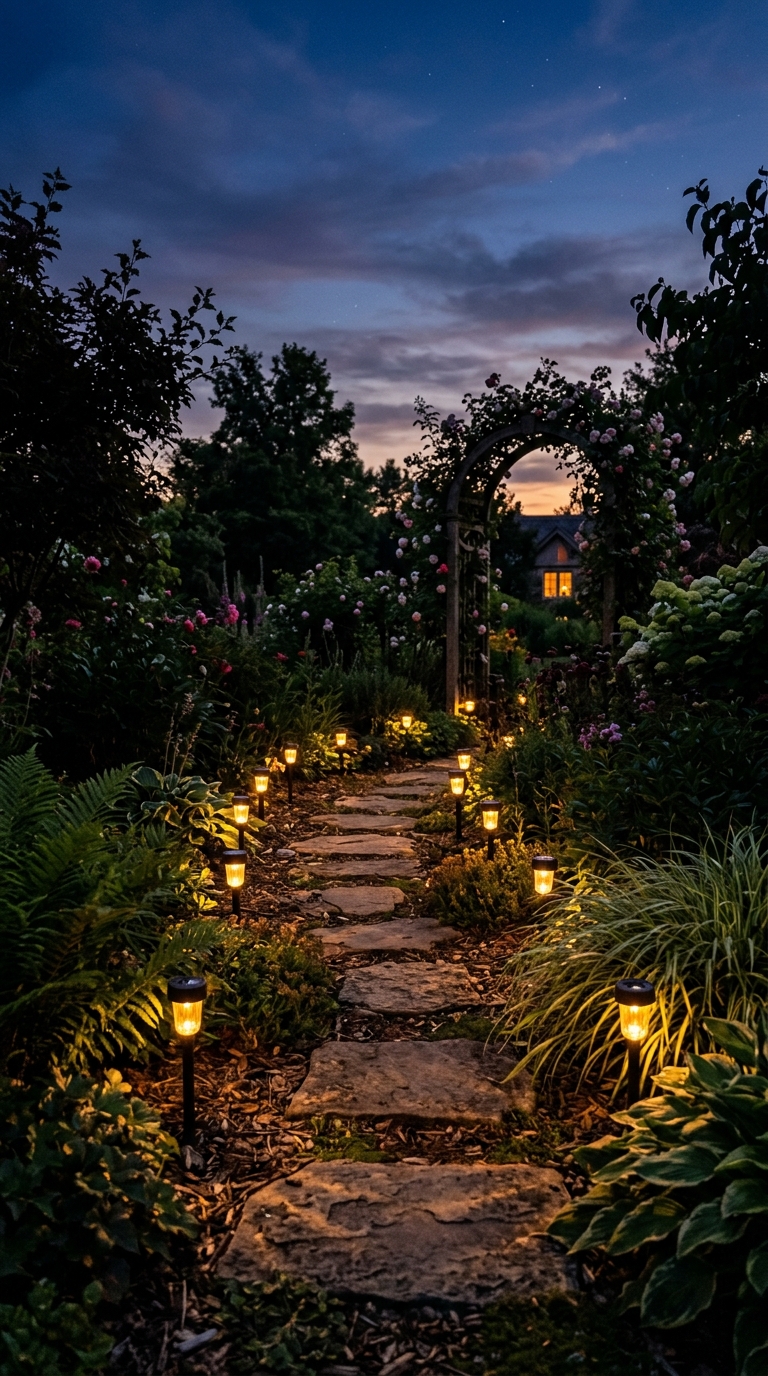
Adding solar lights alongside a stepping stone path turns a beautiful daytime feature into a genuinely magical evening one. The warm glow of low-profile solar stake lights lined up along a stone path looks stunning after dark — and costs almost nothing to run.
This is also a smart safety upgrade. Well-lit paths prevent tripping hazards and make your outdoor space feel welcoming and inhabited even at night. Choose warm white (2700K) solar lights rather than cool white for the most inviting, cozy ambiance.
Design Highlights:
- Use low-profile solar stake lights, not tall lantern-style, for the cleanest look
- Space lights every 3 to 4 feet on alternating sides of the path
- Choose warm white light (2700K) over cool white for a more inviting glow
- Combine with in-ground LED step lights set beside larger stones for a luxury feel
- Position solar panels to receive direct afternoon sun for the best charge
Herringbone Brick Stepping Stone Path
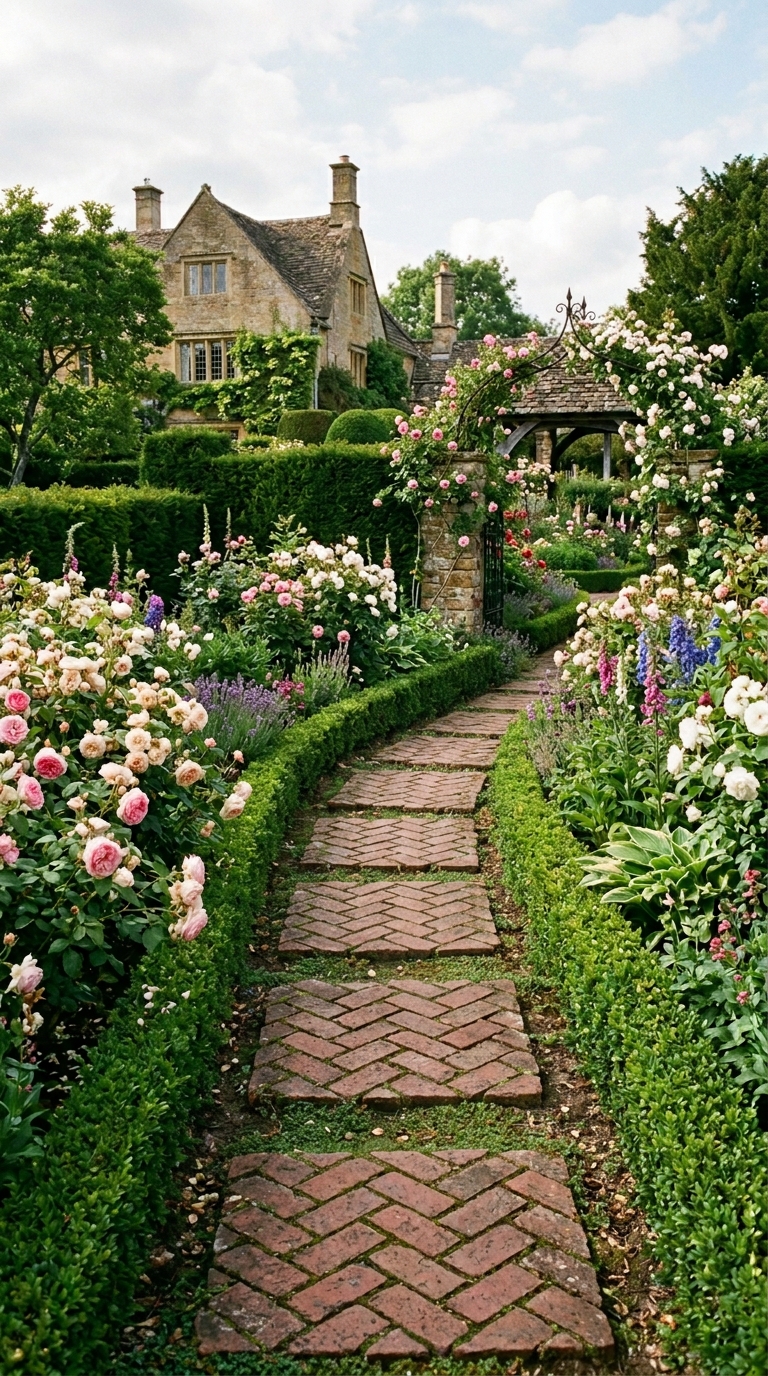
Brick laid in a herringbone pattern has a timeless, classic quality that looks equally at home in a formal English garden or a relaxed Southern farmhouse yard. The interlocking angle of the herringbone pattern also makes it extremely stable underfoot — no rocking or shifting over time.
Use reclaimed brick for the warmest, most character-rich look. New brick works too, but reclaimed pieces bring an aged patina that makes the path look like it’s been there for decades.
Design Highlights:
- Choose reclaimed red or buff brick for the richest aged patina
- Lay bricks on a compacted sand and gravel base for long-term stability
- Edge with steel or stone edging to keep the herringbone pattern contained
- Fill joints with fine kiln-dried sand to lock bricks in place
- Plant creeping thyme or baby’s tears along the border to soften brick edges
Oversized Square Pavers With Grass Joints

This look has been dominating modern landscape design — and it’s easy to see why. Large square pavers (think 24×24 inches or bigger) with strips of lush green grass between them create a bold grid pattern that photographs beautifully and feels satisfyingly structured underfoot.
It works best in open, spacious backyards where the pattern has room to breathe. Pair with a simple lawn, minimal planting, and clean outdoor furniture for a cohesive, magazine-worthy result.
Design Highlights:
- Use 24×24 or 36×36 inch concrete or natural stone pavers for maximum impact
- Space pavers about 4 to 6 inches apart and fill gaps with good-quality turf grass seed
- Keep the surrounding lawn meticulously mowed — ragged grass kills this look
- Choose light grey or warm white pavers to contrast with deep green grass
- Add a single statement planter at the end of the path to anchor the design
Stone Path From Patio to Garden Bed
One of the most practical and visually satisfying uses of stepping stones is connecting the patio to the main garden. This simple addition stops the garden from feeling like a separate zone and makes the whole outdoor space flow together as one cohesive living area.
Choose stones that complement or match your patio material — if your patio is concrete, use concrete pavers; if it’s natural stone, continue the same material into the path. Consistency in materials makes a yard feel professionally designed even when it’s completely DIY.
Design Highlights:
- Match the path stone material to your existing patio for a seamless visual flow
- Gradually narrow the path from patio width to a single-stone walkway for a natural taper
- Plant low, fragrant herbs like thyme or chamomile between path stones
- Add a simple garden arch or rose trellis where the path meets the garden bed
- Use landscape fabric and a sand base to prevent sinking near the patio edge
Reclaimed Stone Stepping Walkway
There’s a particular charm to a garden path made from salvaged or reclaimed materials — old granite curbstones, reclaimed cobbles, leftover limestone offcuts. Each piece has a history, and together they create a path with genuine character and warmth that no new material can replicate.
Beyond aesthetics, reclaimed stone is often surprisingly affordable. Local salvage yards, demolition sales, and online marketplaces frequently offer high-quality stone for a fraction of retail price. This is budget-friendly sustainability at its most beautiful.
Design Highlights:
- Source reclaimed granite, cobblestone, or limestone from local salvage yards
- Mix slightly different sizes and tones for an authentic, aged appearance
- Fill gaps with pea gravel or plant creeping thyme between pieces
- Seal the surface lightly to protect without removing the natural aged look
- Combine with vintage garden elements — old clay pots, iron furniture — for a cohesive aesthetic
Side Yard Narrow Stepping Stone Path
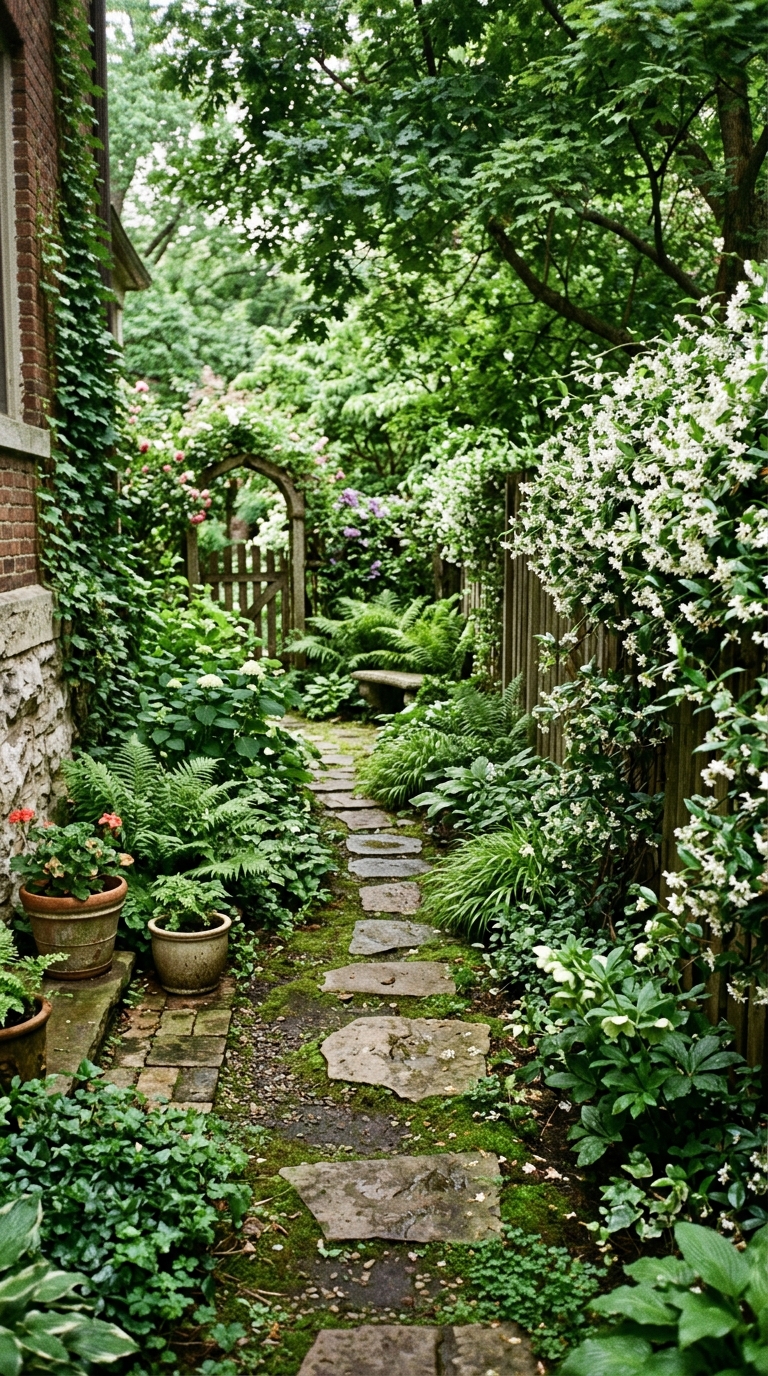
The side yard is one of the most overlooked spaces in any garden — and one of the most transformed by a simple stepping stone path. A narrow stone walkway through a side passage immediately makes the space feel purposeful rather than forgotten. It also provides a practical, mud-free route between the front and back yard.
Keep the design simple in tight spaces. Single-width flat stones work best. Add a climbing plant like clematis or jasmine on the fence beside it, and suddenly a plain side passage feels like a secret garden corridor.
Design Highlights:
- Use single-width flat stones 16 to 18 inches wide to suit narrow passages
- Lay stones directly on compacted sand — no gravel bed needed in tight spaces
- Train a climbing jasmine or clematis on the adjacent fence for vertical interest
- Add a small solar wall light at the entrance to the side path
- Keep the adjacent soil planted with shade-tolerant ground cover to prevent muddy splashing
River Rock & Large Stone Combination Path
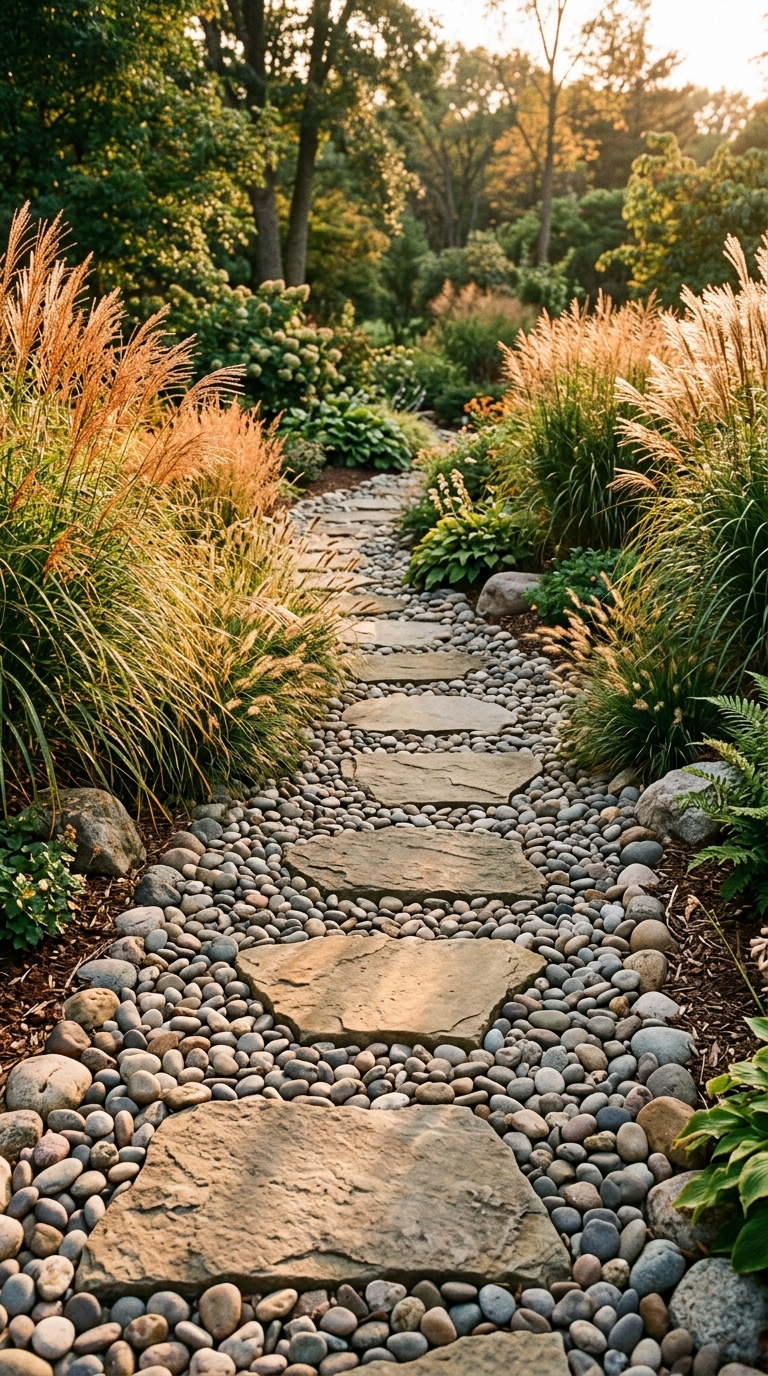
River rocks bring a natural, water-worn texture to garden paths that feels genuinely organic and effortless. Pairing smooth, rounded river rocks as filler with one or two large flat stepping stones creates a beautiful contrast — the stones give you solid footing while the river rocks add visual interest all around them.
This style works especially well near water features, ponds, or in gardens with a naturalistic planting scheme. It’s also one of the most affordable path styles since river rock is widely available and inexpensive in bulk.
Design Highlights:
- Choose river rocks in a single tone — warm grey or sandy beige — for a cohesive look
- Use flat stepping stones at least 18 inches wide for comfortable, stable footing
- Contain river rocks with a simple steel or stone border to prevent scattering
- Plant ornamental grasses or dwarf bamboo alongside for a naturalistic feel
- Add a small bubbling fountain nearby to complement the river-inspired aesthetic
Pebble Mosaic Stepping Stones (DIY)
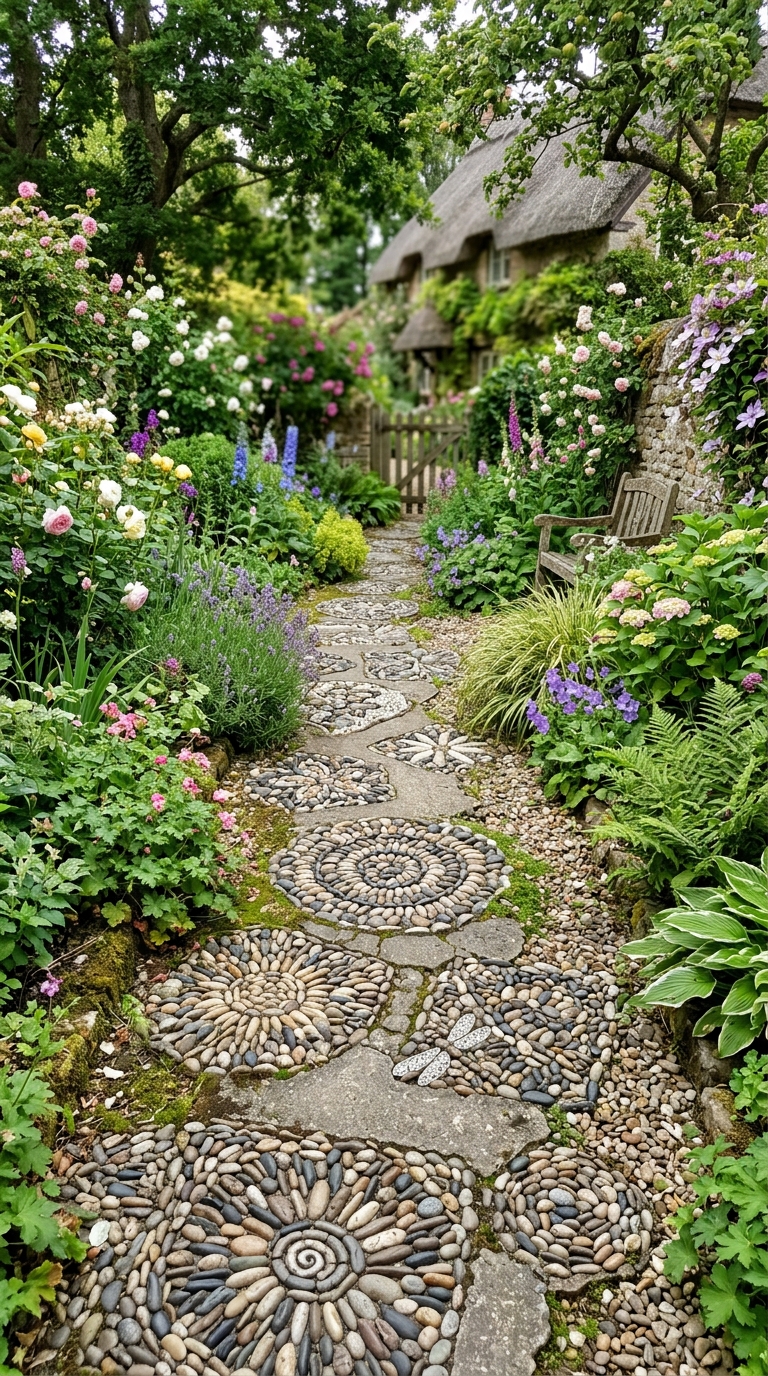
If you want a garden path that’s truly one of a kind, pebble mosaic stepping stones are the most creative and rewarding DIY project you can do outdoors. Using small pebbles, glass pieces, or smooth stones pressed into concrete, you can create patterns, geometric designs, or even floral motifs right in your own backyard.
Each stone becomes a piece of art. The finished path has a handmade, artisan quality that no store-bought paver can replicate — and guests always stop to look twice. It’s a weekend project that genuinely becomes a talking point.
Design Highlights:
- Use a simple round concrete mold (available at garden centers) as your base
- Press pebbles, sea glass, or smooth river stones into wet concrete in your chosen pattern
- Seal finished stones with outdoor concrete sealer for weather protection
- Mix different pebble colors — cream, black, terracotta — for bold visual contrast
- Keep patterns simple for a first project: spirals, sunbursts, or geometric grids work beautifully
Stepping Stone Path Through a Wildflower Meadow
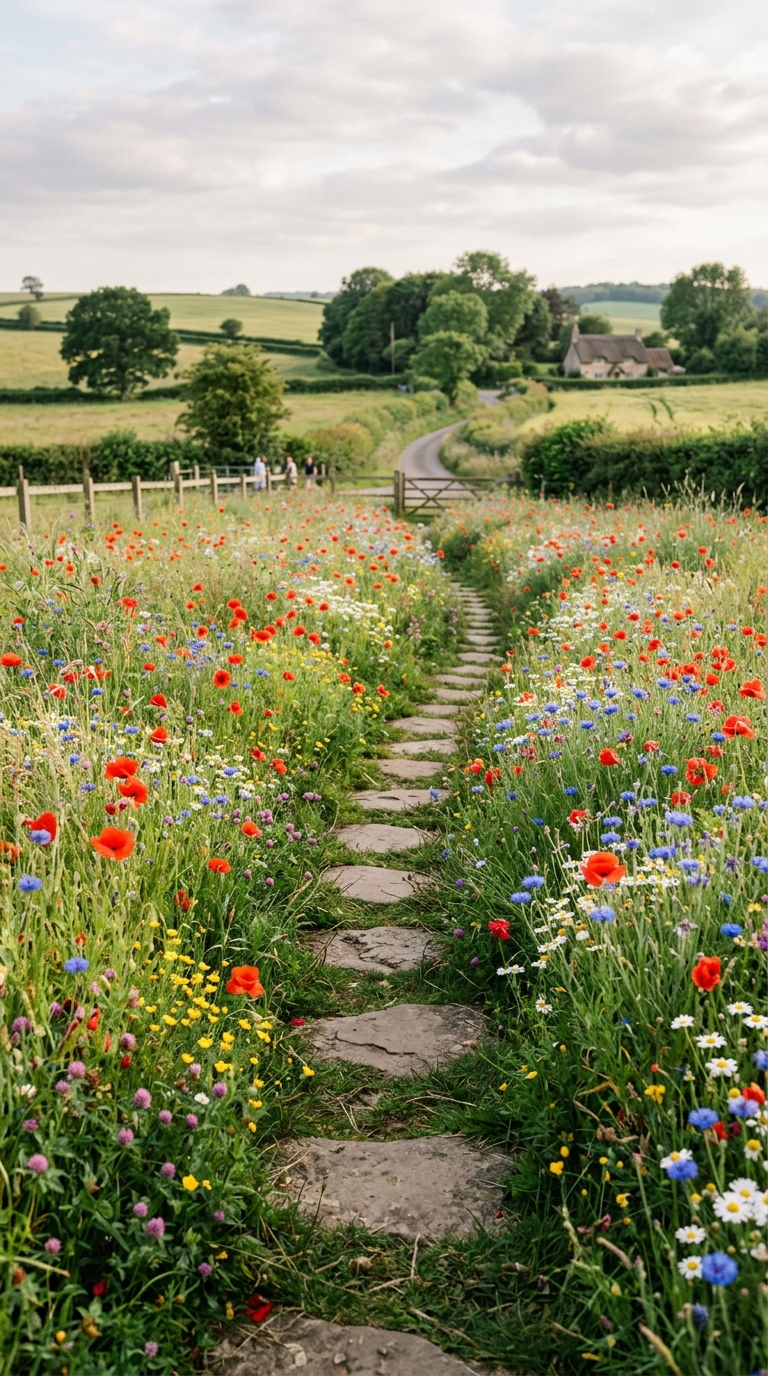
A stepping stone path winding through a wildflower meadow is one of the most romantic and Pinterest-worthy garden designs you can create. The contrast between solid, permanent stone and the soft, constantly changing wildflowers around it is visually stunning in every season — from spring bulbs to summer blooms to autumn seed heads.
This style requires very little maintenance once established. Let the wildflowers self-seed naturally and simply keep the stones clear. The result looks effortlessly beautiful — like a countryside meadow with just enough structure to feel intentional.
Design Highlights:
- Choose a native wildflower seed mix suited to your climate for the easiest establishment
- Use irregular natural stone or large concrete rounds — nothing too formal or uniform
- Let flowers grow right up to the stone edges and even slightly over them
- Include cornflowers, poppies, ox-eye daisies, and cosmos for maximum color variety
- Avoid edging or borders — the path should feel like it emerged naturally from the meadow
FAQS
Q1. What is the best material for a stepping stone walkway?
Flagstone and natural irregular stone are the most popular choices for their durability and timeless appeal. Concrete pavers are the most budget-friendly option. Bluestone and slate offer a more premium, polished look. The best material depends on your yard style, climate, and budget — but any of these will last years with minimal maintenance.
Q2. How far apart should stepping stones be placed?
Space stepping stones roughly 18 to 24 inches apart, measured center to center. This matches a comfortable, natural walking stride for most adults. Before setting stones permanently, walk the path yourself and adjust spacing to feel completely natural underfoot. For children or elderly users, bring stones slightly closer together.
Q3. What do you put between stepping stones to prevent weeds?
Landscape fabric laid underneath is the most effective weed barrier. On top, fill gaps with pea gravel, decomposed granite, or ground cover plants like creeping thyme or Irish moss. These options block weed growth while adding texture and beauty. Avoid leaving bare soil between stones — it invites weeds almost immediately.
Q4. How deep should stepping stones be set in the ground?
Set each stone so it sits roughly half its thickness below ground level — typically 1 to 2 inches below the surrounding lawn or soil surface. This keeps stones stable, prevents rocking, and creates a flush, clean finish. Always set on a leveled sand or fine gravel base for long-term stability and good drainage.
Q5. What ground cover grows best between stepping stones?
Creeping thyme is the most popular choice — low-growing, drought-tolerant, fragrant when stepped on, and produces tiny pink-purple flowers in summer. Other excellent options include Irish moss, ajuga, baby’s tears, and Corsican mint. For shadier paths, golden creeping Jenny or sweet woodruff stays lush without needing direct sunlight.
Conclusion
A stepping stone walkway is one of those rare outdoor upgrades that looks expensive, feels intentional, and actually makes your yard more livable — all at once. Whether you choose rustic flagstone through a cottage garden, sleek concrete slabs in a modern backyard, or mossy slate with creeping thyme blooming between the cracks, the right path completely changes how your outdoor space feels.
The best part? You don’t need a big budget or a professional landscaper. Most of these designs are weekend-friendly, beginner-approved, and endlessly customizable to your yard’s size, style, and climate.
Start with one idea that genuinely excites you. Lay a few stones. See how it feels. That’s usually all it takes before the whole yard starts coming together.
Save this post for when you’re ready to start — and if you found an idea you love, pin it so you can come back to it.